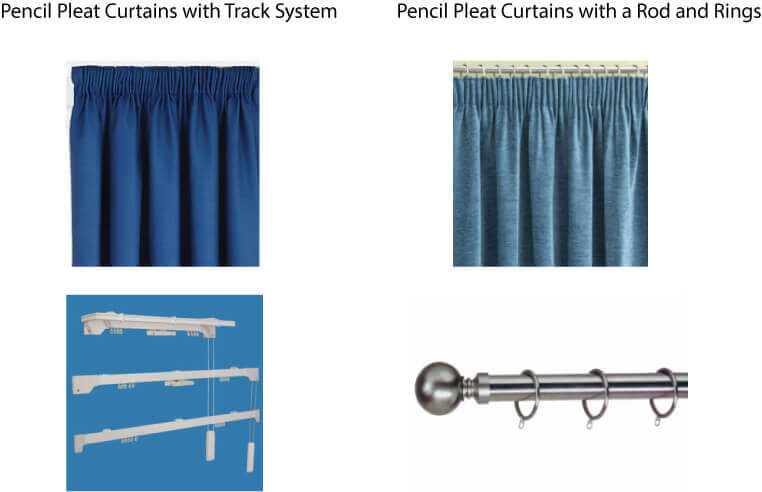
Hanging pencil pleat curtains, while similar to the precision required for hanging pinch pleats, involves its own unique set of steps to ensure a perfect presentation. Unlike their pinch pleat counterparts, pencil pleat curtains do not require the insertion of hooks. Instead, they follow a straightforward two-stage process that we've meticulously outlined for you below!
Please note: This guide is intended for Ready To hang or Ready Made Pencil Pleat Curtains purchased from Quickfit Blinds & Curtains. For installation instructions on custom made pencil pleat curtains, visit our guide on ordering custom made pencil pleat curtains.
Now, let's get started!
In this easy to follow tutorial guide you will learn the following:
- About Pencil Pleat Curtains
- How To Measure Pencil Pleat Curtains?
- How To Hang Pencil Pleat Curtains?

About Pencil-Pleat Curtains
Pencil-pleat curtains feature folds gathered closely together to resemble a row of pencils laid side by side. They are created by pulling the cords on the heading tape and twisting them, and then tying them off tidily to keep the pleats in place. Pencil-pleat curtains can be used on curtain rods or tracks, and the widths of the pencil pleats can be altered slightly by drawing on three cords at the back of the heading tape.
There are Australian Standards for draw cords on all curtain and blind products that have strings, cords, or chains. You must make sure that the cords are tied off and not hanging down with a loop so that no child can get there head caught in the loop.
It is very easy to select the correct size, since pencil pleats are adjustable.
Our ready to hang pencil-pleat curtains are available with the following specifications:
- All curtains are sold in pairs
- The standard size is 213cm long
- They are made for standard window heights of 210cm
- They are available in four other sizes
- They are made to fit windows from 80cm to 340cm

How To Measure Pencil-Pleat Curtains
Measuring pencil pleat curtains is a critical step to ensure they fit your window perfectly and look great. After all, you don't want to end up with a pair of pencil pleat curtains that are too short or too wide for your window frame.
To measure pencil pleat curtains, follow this step by step guide:
Step 1: Measure the Width:
-
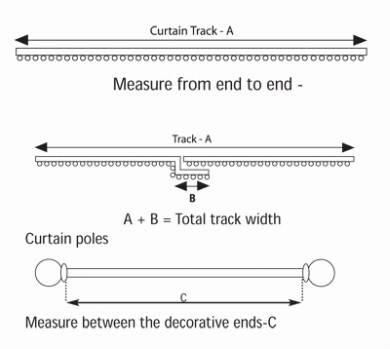
For a Curtain Pole: Measure the length of the pole between the finials (decorative ends).
-
For a Curtain Track: Measure the full length of the track.
- Adding Width for Gather: Pencil pleat curtains are designed to be gathered when hung. To achieve a full look, double or even triple the measured width, depending on how much gather and fullness you desire.
Step 2: Measure the Drop:
-
For a Pole: Measure from the bottom of the ring (where the curtain hook will sit) to where you want the curtains to finish (usually the windowsill, the floor, or somewhere in between).
-
For a Track: Measure from the top of the track to your desired end point.
- For Sill Length: Curtains should finish approximately 1.25 cm (1/2 inch) above the sill.
- For Below Sill Length: Aim for about 15 cm (6 inches) below the sill.
- For Floor Length: Curtains should typically fall about 1.25 cm (1/2 inch) above the floor to avoid dragging.
Step 3: Account for Heading Tape:
Ensure you measure from the top of the curtain (where the tape is) if you're using a track. If using a pole with rings, measure from the eye (where the hook goes) to ensure accuracy.
Step 4: Check Multiple Points:
Measure the drop at multiple points along the width of the window to account for any discrepancies due to uneven floors or sills.
Step 5. Final Check:
Double-check all measurements to ensure accuracy before purchasing or cutting any fabric. Once you have your measurements, you can select curtains that match these dimensions or use them to order custom-made curtains for a perfect fit. Remember, it's always better to measure twice and cut once!


How To Hang Pencil-Pleat Curtains
When it comes to hanging pencil pleat curtains, this is typically achieved in 2 parts with various steps. The first part involves preparing the curtains and mounting the curtain rod or track. Then, once all of that is prepared, you can then proceed onto the second part which involves installing the hooks.
Regardless of which stage you are currently with this process, here is a step-by-step guide for each section:
Part 1: Preparing the Curtains
Before you begin to install your hooks and hang your pencil pleat curtains, the first step in the process is to prepare your curtains ready for hanging. Follow these steps below to get started with hanging your pencil pleat curtains:
- Step 1: Iron the curtains on the non-white side with a cool to medium heat iron.
- Step 2: Your curtain rod or track should be mounted just above the window and overlap past each end of the window by approx 15-20cm. Larger windows overlap a little bit more. This is so that when the curtains are opened, they stack next to the window and not in front of the window.
- Step 3: Measure the track or pole as shown in the diagram, and halve this measurement.
- Step 4: Pull the three cords on the back of the curtain until each curtain panel bunches up to this width. Tie the three cords off in a bow to hold the pleats in place. Don't cut the strings. If you cut the strings then you will not be able to take the curtains down to launder them. Neatly tuck the tied off cords behind the curtain.
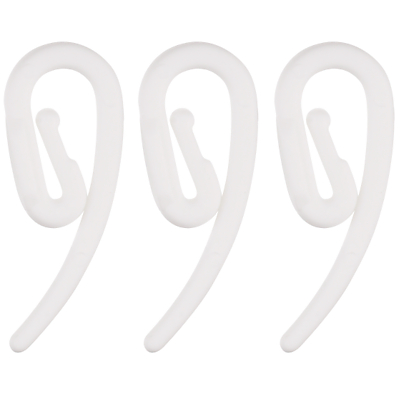
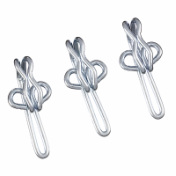
- Step 5: Make sure you have enough curtain hooks to match the number of rings on the track or curtain rod. We’ve included a few images of what those hooks should look like — metal and plastic are both acceptable materials.
Part 2: Installing the Hooks
Once you have pulled the three strings at the back of the curtains and set your curtains to the desired width, the next phase of installing pencil pleat curtains is to put the hooks into the tape. You can achieve this by following the steps below:
- Step 1: Spread the desired number of hooks evenly from one end of the curtain to the other. There should be the same number of hooks as rings in the track or rod, split half and half between the two curtains.
- Step 2: Slide the hooks into the slots in the tape. You can select from three different heights (as seen in the image). This is so you can adjust the length of the curtain to hover about 1cm off the floor.
- Step 3: Measure from the bottom of the ring on the track or rod to the floor.
- Step 4: Now measure from the bottom of the curtain the same length up to the tape, and select the best position to put the hooks.
- Step 5: Once all the hooks are in place, you are now ready to hang your curtains!
